
Wireless Turtle Beach Headset on XBOX ONE
Page 1 of 1

Wireless Turtle Beach Headset on XBOX ONE
![]() by Corp Dwayne Hicks Mon Mar 21, 2016 10:48 pm
by Corp Dwayne Hicks Mon Mar 21, 2016 10:48 pm
Wireless Turtle Beach Headset on XBOX ONE


Many of you know that the old XBOX 360 Controller is different from the XBOX ONE. Due to that, all the wireless headset adapters for Turtle Beach and Tritton won't work. Turtle Beach has stated "Xbox One uses proprietary technology that only Microsoft can produce and manufacture. We have no control over this." So as frustrated that i am for paying $300 for the Turtle Beach Tango, I decided to take action and make something work to get my headsets up and running. Here are the steps that I took, total cost is under $20 if you have some of the parts already.
PART NEEDED (Items marked FREE are parts I already had):
1ea - ($0.10) - 510ohm 1/8 watt resistor
1ea - ($0.16) - 820ohm 1/8 watt resistor
1ea - ($0.50) - LM317T
1ea - ($4.68) - mini board (Cut later)
1ea - ($5.99) - USB Mini Jack (Pack of 10)
1ea - (FREE) - USB cord (4") (you can also use a female mini jack and solder to the board, plan to do that on the next one I make)
1ea - (FREE) - 360 "AA" Battery Pack (Purchase 3 for $3.99)
1ea - (FREE) - Turtle Beach Bluetooth Puck (one you already have for the 360)
1ea - (FREE) - Broken 360 Controller (optional)
1ea - (FREE) - XBOX ONE Chat Headset
1ft - (FREE) - 26ga wire (Took from old PC)
TOOLS NEEDED:
Solder Iron
Solder w/flux
Wire strippers
Hot Glue Gun
Safety Torx T8 (disassemble 360 controller)
Torx screwdriver (XBOX Chat headset – quite small).
Step 1: Dismantle 360 Controller

360 Controller Steps:
Take the old 360 controller apart (Safety Torx T8)
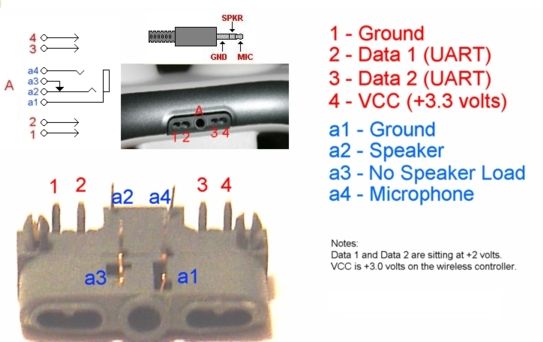
Remove the bottom connector where the chat adapter plugs in.
(You can solder directly to the Turtle Beach Bluetooth puck if you don't have a 360 controller that you want to take apart.)
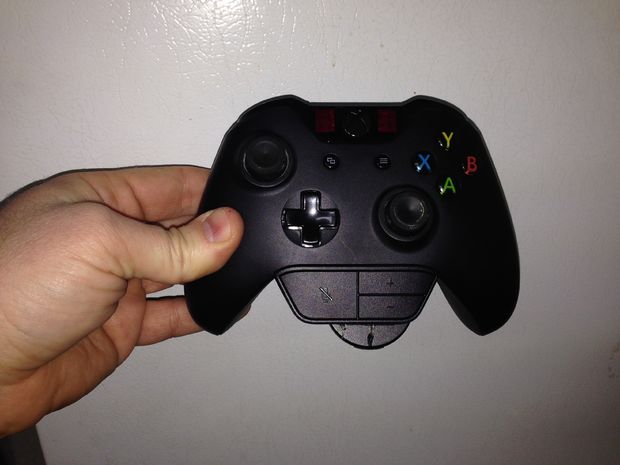
Step 2: Dissemble XBONE Chat Headset


XBOX ONE Chat Headset:
Take the XBOX ONE Chat Headset apart. (Torx Screws)
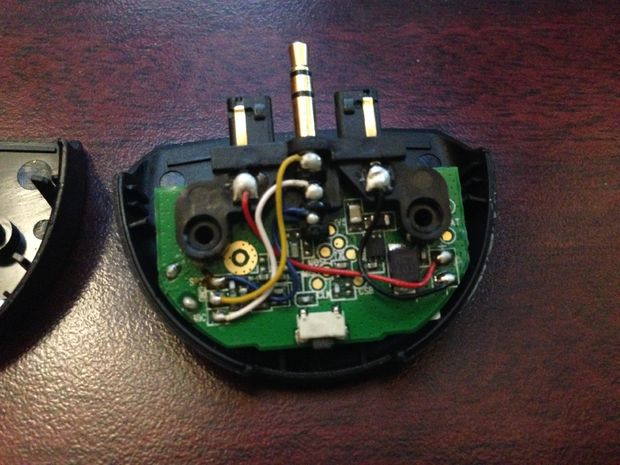
Remove wires from the 4 pads. (Don't overheat!)
Drill small hole for 3 wires to come out as shown. You will need to trim the bottom cover a bit to prevent it from pinching the wires.
With the wires running out the hole as shown, Solder XBOX ONE MIC to 360 connector Pin A4
Solder XBOX ONE HPL to 360 connector A2
Solder XBOX ONE GND to 360 connector A1
Soldier XBOX ONE GND to XBOX ONE HPR (Jumper)
Re-assemble the XBOX ONE chat headset.
XBOX ONE CHAT HEADSET WIRING (From left the right):
Microphone Ground [GND] (originally the bare wire).
Microphone Positive [MIC] (originally the white wire).
Speaker Ground [HPR] (originally the black wire).*
Speaker Positive [HPL] (originally the blue wire).
*Jump HPR to Mic Ground
Step 3: Soldier Directly To Puck (OPTIONAL)

THIS STEP IS ONLY FOR THOSE THAT DO NOT HAVE AN OLD 360 CONTROLLER
Remove sticker from the bottom of the puck.
Remove bottom cover by 2 TORX screws
Remove front cover and drill small hole in front cover of the puck next to the audio jack for 5 wires to go through.
Solder 3.3V to 3.3V Out on your PC Board
Solder Power Ground to the Ground on your PC Board
Solder MIC to MIC in the XBOX ONE Chat Headset
Solder Speaker to HPL in the XBOX ONE Chat Headset
Solder Ground to GND in the XBOX ONE Chat Headset
*Jump HPR to Mic Ground
XBOX ONE CHAT HEADSET WIRING (From left the right):
Microphone Ground [GND] (originally the bare wire).
Microphone Positive [MIC] (originally the white wire).
Speaker Ground [HPR] (originally the black wire).*
Speaker Positive [HPL] (originally the blue wire).
*Jump HPR to Mic Ground
Step 4: Voltage to Puck


Now we need to power the Bluetooth Turtle Beach Puck. It requires 3.3v a normal USB plug gives 5v. So we need to reduce the voltage.
Use the this page as a reference for wiring the board and getting the voltage as close to 3.3
Voltage Calculator
R1 = 510ohms
R2 = 820ohms
The chip should be facing you with the writing on it.
VIN = 5V In
ADJ = Goes to ground
VOUT = 3.3V Out
Once you have the board wired up and have 3.3v (+/- .6v), then:
Solder VOUT (3.3V) to 360 connector #4
Solder Ground to 360 Connector #1
Step 5: Gut 360 Battery Pack


Gut the 360 "AA" Battery Pack
Remove the quick release from the "AA" pack.
Remove all metal from the pack
Take a Dremel and remove the battery divider
Insert the assembled pc board into the battery pack with the USB cable going out the front.
Attach the all the pieces and test, everything should work!
Once you test everything, you can hot glue your new adapter to the bottom of the XBOX ONE chat adapter.
So for less than $20, you can make an adapter that Turtle Beach won't make. Let me know what you think...

Corp Dwayne Hicks- Admin
- Posts : 74
Reputation : 0
Join date : 2016-03-12
Location : London -

» Xbox 360 motherboards
» Intake fan on your XBox.
» Things You Must Know About The Xbox:
» Determine Version of Xbox
» Xbox Softmod Kit Tutorial
» Intake fan on your XBox.
» Things You Must Know About The Xbox:
» Determine Version of Xbox
» Xbox Softmod Kit Tutorial
Page 1 of 1
Permissions in this forum:
You cannot reply to topics in this forum|
|
|