
TSOP Flashing Tutorial
Page 1 of 1

TSOP Flashing Tutorial
![]() by Corp Dwayne Hicks Sat Mar 12, 2016 10:43 pm
by Corp Dwayne Hicks Sat Mar 12, 2016 10:43 pm
Introduction
I decided to write this Tutorial after attempting to mod my own Xbox and I take no credit for the information contained within this Tutorial as I did not figure any of this out, I simply trolled the various forums and found many tutorials written to cover the process. I am simply presenting what I think is the easiest way to accomplish the task at hand which is to Flash the 'TSOP' with a Bios of your choice. What you will read is a compilation of other Tutorials I have read and I have combined the best resources to make the task as easy as possible. Important you can break, fudge, kill or maim a perfectly good Xbox if you are not careful so I warn you in advance don't complain or cry to me it you make a mistake, the steps I will describe worked for me and countless others, proceed with caution and make sure you fully understand the process before attempting it.
Tools and Items you will require
1.Torx 10 and 20 screwdrivers to take the Xbox apart.
2. Memory card, use the Microsoft version.
3.Microsoft Controller or Action Replay/Gameshark with USB Memory card Writer.
4.Original copy of James Bond 007: Agent under Fire (Platinum version may not work).
5.Soldering Iron 15 watt, Solder and de-soldering braid.
6.A special 007 Agent Under Fire save game and whatever bios you wish to flash.
7.'SlaYer's Auto-Installer.iso'
All of these items and how to obtain them are listed in the steps below.
Get the right Game
You need to obtain an original copy of 'James Bond 007: Agent under Fire' or 'Mech Assault' I will be referring to the '007' game for this tutorial, the other game should work nearly identical.
I mentioned that the Platinum versions may not work. I have read that any version with this number 1448517 works and versions with this number 1448527 does not work, click the photo below to enlarge it.

Get the right files
All of the files you require are available from one site but a free registration is required to access the downloads section please visit them and register before clicking on the following links or access to the files will be denied click Here to register the link will take you to eurasia.nu registration screen. Important All the files you will download use a compression called '.rar' so you will need a tool called Winrar to decompress the files it can be downloaded from Here.
I used the eurasia tool called Highway '007mech Flash Pack v1.0' download it Here
basically its the exploit everyone is using but it has been combined with the ease of a menu system and tools from Evox. it allows flashing of most Xbox's through Evox or for some Winbond chips an automated 'Raincoat' flash can be used, both are selectable through a menu system!
1.You need a Bios use 'Xecuter2 4981' download it Here
2.XBtool is required to modify the Bios download it Here
3.Here is a BitTorrent file to download 'Slayers Auto Installer' click Here
If you do not have BitTorrent or wish to use eMule or edonkey2000 then simply do a search for 'Slayer' and you should be able to locate and download the file easily.
Three ways to get the save game on your Xbox
1.If you a Modded Xbox already and a PC click Here
2.Using an Action Replay or GameShark USB Memory card writer click Here
3.Using an Xbox Controller and a PC click Here
4.Using a USB Flash Memory Stick click Here
Soldering the 'write' points
You should now be ready to solder the TSOP write points, to accomplish this you must verify which version of the Xbox Motherboard you have. This is the most critical step and the most dangerous one as you could easily damage the Motherboard if not careful
1.First you Need to open the Xbox click Here for instructions
2. Identify which version of Xbox you have by comparing the internals to the photos Here
3.Now you just need to determine the points to solder by looking at the photos Here
Note: If you are new to soldering or just clumsy, try your skills out first and practice until you get the hang of it. There are resources that explain in detail the proper way to solder. Practice soldering points on an old circuit board that you don't need. Remember Heat is the enemy so use a low powered 15 Watt Soldering Iron and always use Rosin Core solder not Acid core as it's not suitable for electronic circuits.
Flashing the TSOP
Time to Load our 007 save game!
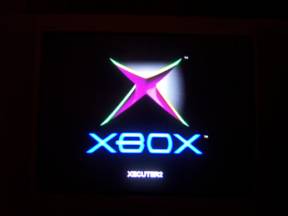
Simply start the 007 Agent Under Fire Game (The original of course) once in the game select the option to load a saved game from the Hard-drive and after a wait of about 10 seconds you should now see the Evox dashboard screen. Now you simply scroll down the Menu until you see the Bios option and press the 'A' button the Bios you included in the save game file should be selectable, make sure it the right one and press the 'A' button if everything is in order you should see the message erasing TSOP followed by programming the TSOP, when completed power off the xbox and reboot it should now boot with the logo and colors you selected while preparing your bios and it should now say 'XECUTER2' as in the photo below.
If you saw any messages about the TSOP being write protected it could be one of two reasons, the first is that your soldering was incorrect and needs to be fixed, the second possible reason is your Xbox may be very new and using a TSOP that Evox does not understand. If this is the case select the Eurasia Raincoat Flash option and let it proceed if it still fails with the same message then your solder points need to be double checked failing that you will need help beyond the scope of this article and you should try asking for help on the forums at either eurasia.nu or xbox-scene.com
The TSOP is flashed now what?
If installing Linux simply follow the instructions that came with your distribution. If you wish to simply run games from the DVD drive (originals or copies) do nothing you're done! If you wish to install a larger hard-drive or use a replacement Dashboard you will need the 'SlaYer's Auto-Installer.iso' You will of course need to burn the '.iso' using whatever burning software you have, I suggest you use Nero if you are unsure of how to burn an '.iso' check the documentation that came with your software.
Now that you have your '.iso' image burnt you simply boot with the disk and when the Evox menu appears select the option that best describes your situation, press the 'A' button it the disk will complete the needed steps. If you wish to replace the hard drive with a larger one simply swap out the old drive with the new one,
If unsure how click Here if your swap was done correctly you should be able to boot with the 'SlaYer's Auto-Installer.iso' and select the option for the size of drive you want, press the 'A' button, the disk will complete the needed steps. Remember this '.iso' can either help you or allow you to totally trash your Xbox, be careful read the menus and all should be fine.
As always I hope this article has been useful
I decided to write this Tutorial after attempting to mod my own Xbox and I take no credit for the information contained within this Tutorial as I did not figure any of this out, I simply trolled the various forums and found many tutorials written to cover the process. I am simply presenting what I think is the easiest way to accomplish the task at hand which is to Flash the 'TSOP' with a Bios of your choice. What you will read is a compilation of other Tutorials I have read and I have combined the best resources to make the task as easy as possible. Important you can break, fudge, kill or maim a perfectly good Xbox if you are not careful so I warn you in advance don't complain or cry to me it you make a mistake, the steps I will describe worked for me and countless others, proceed with caution and make sure you fully understand the process before attempting it.
Tools and Items you will require
1.Torx 10 and 20 screwdrivers to take the Xbox apart.
2. Memory card, use the Microsoft version.
3.Microsoft Controller or Action Replay/Gameshark with USB Memory card Writer.
4.Original copy of James Bond 007: Agent under Fire (Platinum version may not work).
5.Soldering Iron 15 watt, Solder and de-soldering braid.
6.A special 007 Agent Under Fire save game and whatever bios you wish to flash.
7.'SlaYer's Auto-Installer.iso'
All of these items and how to obtain them are listed in the steps below.
Get the right Game
You need to obtain an original copy of 'James Bond 007: Agent under Fire' or 'Mech Assault' I will be referring to the '007' game for this tutorial, the other game should work nearly identical.
I mentioned that the Platinum versions may not work. I have read that any version with this number 1448517 works and versions with this number 1448527 does not work, click the photo below to enlarge it.
Get the right files
All of the files you require are available from one site but a free registration is required to access the downloads section please visit them and register before clicking on the following links or access to the files will be denied click Here to register the link will take you to eurasia.nu registration screen. Important All the files you will download use a compression called '.rar' so you will need a tool called Winrar to decompress the files it can be downloaded from Here.
I used the eurasia tool called Highway '007mech Flash Pack v1.0' download it Here
basically its the exploit everyone is using but it has been combined with the ease of a menu system and tools from Evox. it allows flashing of most Xbox's through Evox or for some Winbond chips an automated 'Raincoat' flash can be used, both are selectable through a menu system!
1.You need a Bios use 'Xecuter2 4981' download it Here
2.XBtool is required to modify the Bios download it Here
3.Here is a BitTorrent file to download 'Slayers Auto Installer' click Here
If you do not have BitTorrent or wish to use eMule or edonkey2000 then simply do a search for 'Slayer' and you should be able to locate and download the file easily.
Three ways to get the save game on your Xbox
1.If you a Modded Xbox already and a PC click Here
2.Using an Action Replay or GameShark USB Memory card writer click Here
3.Using an Xbox Controller and a PC click Here
4.Using a USB Flash Memory Stick click Here
Soldering the 'write' points
You should now be ready to solder the TSOP write points, to accomplish this you must verify which version of the Xbox Motherboard you have. This is the most critical step and the most dangerous one as you could easily damage the Motherboard if not careful
1.First you Need to open the Xbox click Here for instructions
2. Identify which version of Xbox you have by comparing the internals to the photos Here
3.Now you just need to determine the points to solder by looking at the photos Here
Note: If you are new to soldering or just clumsy, try your skills out first and practice until you get the hang of it. There are resources that explain in detail the proper way to solder. Practice soldering points on an old circuit board that you don't need. Remember Heat is the enemy so use a low powered 15 Watt Soldering Iron and always use Rosin Core solder not Acid core as it's not suitable for electronic circuits.
Flashing the TSOP
Time to Load our 007 save game!
Simply start the 007 Agent Under Fire Game (The original of course) once in the game select the option to load a saved game from the Hard-drive and after a wait of about 10 seconds you should now see the Evox dashboard screen. Now you simply scroll down the Menu until you see the Bios option and press the 'A' button the Bios you included in the save game file should be selectable, make sure it the right one and press the 'A' button if everything is in order you should see the message erasing TSOP followed by programming the TSOP, when completed power off the xbox and reboot it should now boot with the logo and colors you selected while preparing your bios and it should now say 'XECUTER2' as in the photo below.
If you saw any messages about the TSOP being write protected it could be one of two reasons, the first is that your soldering was incorrect and needs to be fixed, the second possible reason is your Xbox may be very new and using a TSOP that Evox does not understand. If this is the case select the Eurasia Raincoat Flash option and let it proceed if it still fails with the same message then your solder points need to be double checked failing that you will need help beyond the scope of this article and you should try asking for help on the forums at either eurasia.nu or xbox-scene.com
The TSOP is flashed now what?
If installing Linux simply follow the instructions that came with your distribution. If you wish to simply run games from the DVD drive (originals or copies) do nothing you're done! If you wish to install a larger hard-drive or use a replacement Dashboard you will need the 'SlaYer's Auto-Installer.iso' You will of course need to burn the '.iso' using whatever burning software you have, I suggest you use Nero if you are unsure of how to burn an '.iso' check the documentation that came with your software.
Now that you have your '.iso' image burnt you simply boot with the disk and when the Evox menu appears select the option that best describes your situation, press the 'A' button it the disk will complete the needed steps. If you wish to replace the hard drive with a larger one simply swap out the old drive with the new one,
If unsure how click Here if your swap was done correctly you should be able to boot with the 'SlaYer's Auto-Installer.iso' and select the option for the size of drive you want, press the 'A' button, the disk will complete the needed steps. Remember this '.iso' can either help you or allow you to totally trash your Xbox, be careful read the menus and all should be fine.
As always I hope this article has been useful

Corp Dwayne Hicks- Admin
- Posts : 74
Reputation : 0
Join date : 2016-03-12
Location : London -

» FlashBIOS v3.03 Tutorial (Rev 1.00)
» Xbox Softmod Kit Tutorial
» XBOX 2TB SATA Upgrade Tutorial
» Easier clear jewel tutorial (v0.1)
» S-DD1 and SA1 Modding Tutorial (SO44 Mask ROM games)
» Xbox Softmod Kit Tutorial
» XBOX 2TB SATA Upgrade Tutorial
» Easier clear jewel tutorial (v0.1)
» S-DD1 and SA1 Modding Tutorial (SO44 Mask ROM games)
Page 1 of 1
Permissions in this forum:
You cannot reply to topics in this forum|
|
|