
Duo X3 Installation
Page 1 of 1

Duo X3 Installation
![]() by Corp Dwayne Hicks Wed Mar 23, 2016 2:05 am
by Corp Dwayne Hicks Wed Mar 23, 2016 2:05 am
Duo X3 Installation
Click an image below to see the full size image. We recommend 30AWG wire to make these connections. You will be either installing a headder pin or using the quick solder pads to connect the chip to the motherboard. Then you will need to solder the D0 wire so the chip can override the stock bios. You can then solder BT to ground forcing the chip to always be on or solder BT to the point described in the documentation if you would like to enable/disable the chip via the power button.
Determine the version of your console
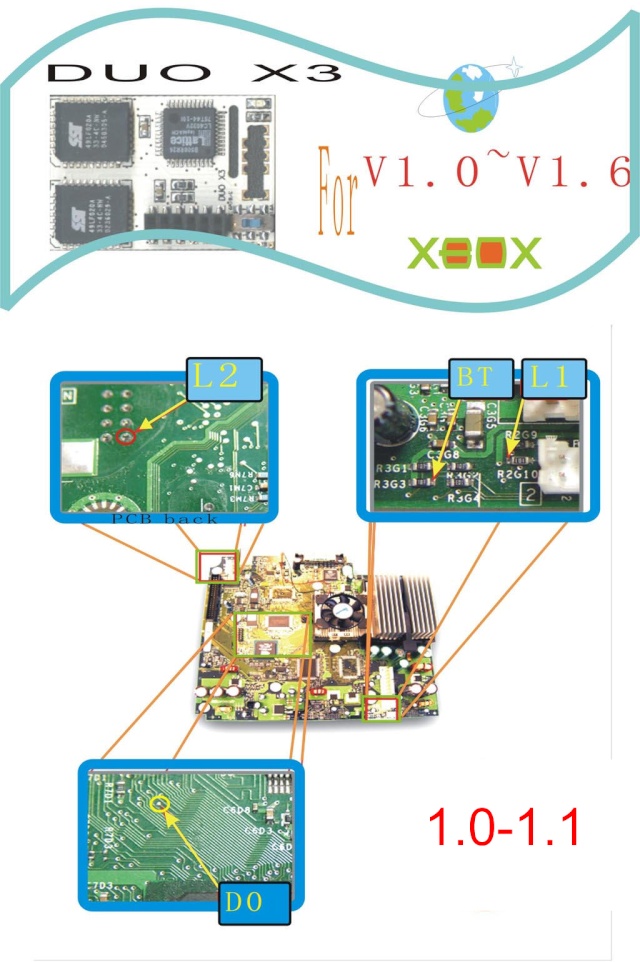 For 1.0 - 1.1
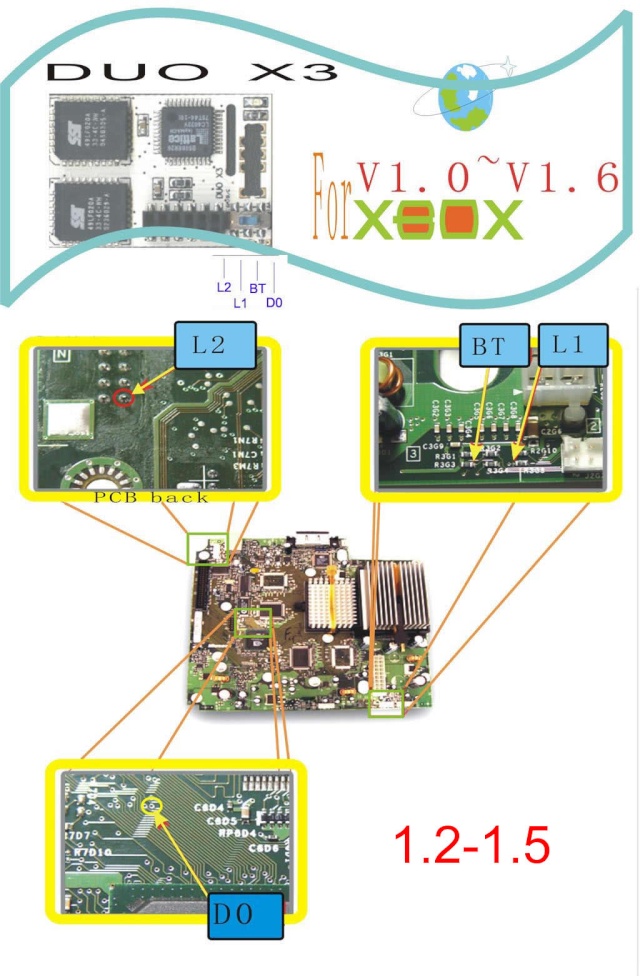 For 1.2-1.5
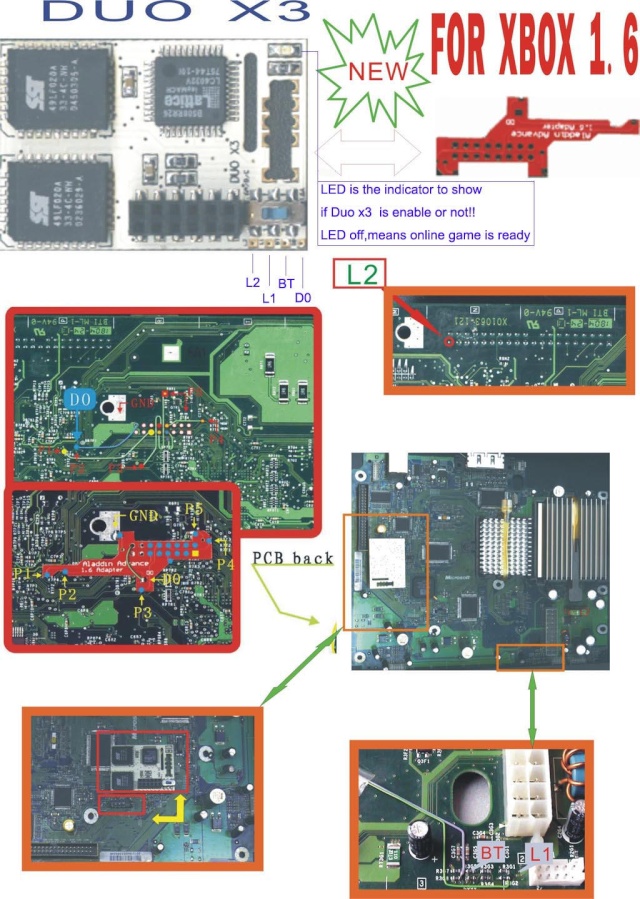 For 1.6A and 1.6B
Llamma Recommended D0 solder points (bottom of the motherboard) We prefer these over the ones described in the documentation, they are easier to solder. Notice the red dots on the LPC, those are the spots the pins are installed at, four positions are not used
1.0-1.1 1.2-1.5
081606 067.jpg (205451 bytes) 081606 062.jpg (184143 bytes)
Header Pin Installation- note the positioning of the chip, it mounts almost touching the IDE cable.
081606 077.jpg (81999 bytes) 081606 081.jpg (57063 bytes)
Quick solder installation
081606 074.jpg (154760 bytes)
Lay the chip on the board so it is positioned as shown, then using a low temperature electronics soldering iron make a connection from the motherboard to the chip for all nine points. This is a great option for 1.0 and 1.1 motherboards that have the solder points filled. All other versions we recommend the header pin method. You will still need to make the connections for BT and D0 as well as optionally doing L1 and L2 when using the quick solder method.
Double check all your connections and power on, you should see a Flash Bios 3.0.1 Unauthorized or 3.0.3 Unauthorized screen. You will need to have a 256K bios ready to replace the flash bios that is provided. We recommend the network flashing process you can read about it in greater detail here (The user guide is for the bios itself based on the one created by TeamXecuter, the site in the link does not support the Duo X3 chip but the bios it uses is the same)
Click an image below to see the full size image. We recommend 30AWG wire to make these connections. You will be either installing a headder pin or using the quick solder pads to connect the chip to the motherboard. Then you will need to solder the D0 wire so the chip can override the stock bios. You can then solder BT to ground forcing the chip to always be on or solder BT to the point described in the documentation if you would like to enable/disable the chip via the power button.
Determine the version of your console
For 1.0 - 1.1For 1.2-1.5For 1.6A and 1.6BLlamma Recommended D0 solder points (bottom of the motherboard) We prefer these over the ones described in the documentation, they are easier to solder. Notice the red dots on the LPC, those are the spots the pins are installed at, four positions are not used
1.0-1.1 1.2-1.5
081606 067.jpg (205451 bytes) 081606 062.jpg (184143 bytes)
Header Pin Installation- note the positioning of the chip, it mounts almost touching the IDE cable.
081606 077.jpg (81999 bytes) 081606 081.jpg (57063 bytes)
Quick solder installation
081606 074.jpg (154760 bytes)
Lay the chip on the board so it is positioned as shown, then using a low temperature electronics soldering iron make a connection from the motherboard to the chip for all nine points. This is a great option for 1.0 and 1.1 motherboards that have the solder points filled. All other versions we recommend the header pin method. You will still need to make the connections for BT and D0 as well as optionally doing L1 and L2 when using the quick solder method.
Double check all your connections and power on, you should see a Flash Bios 3.0.1 Unauthorized or 3.0.3 Unauthorized screen. You will need to have a 256K bios ready to replace the flash bios that is provided. We recommend the network flashing process you can read about it in greater detail here (The user guide is for the bios itself based on the one created by TeamXecuter, the site in the link does not support the Duo X3 chip but the bios it uses is the same)

Corp Dwayne Hicks- Admin
- Posts : 74
Reputation : 0
Join date : 2016-03-12
Location : London -

Page 1 of 1
Permissions in this forum:
You cannot reply to topics in this forum|
|
|