
Master System 2 50/60Hz
Page 1 of 1

Master System 2 50/60Hz
![]() by Corp Dwayne Hicks Thu Mar 17, 2016 9:20 pm
by Corp Dwayne Hicks Thu Mar 17, 2016 9:20 pm
Master System 2 50/60Hz Switch
The Sega Master System 2 is capable of displaying a PAL 60Hz picture, if you perform this mod, then you'll be able to get a full screen and full speed picture without a RGB Scart lead (unlike the Mega Drive).
Once you've dismantled your console, and removed the shielding (don't mix up the screws!), remove the motherboard to make it easier to work with.
Just behind the controller ports, look for a chip with Sega 315-5246 written on it, it's got 64 legs, and we want leg 57, it's easy to find it, just count back from leg 64 which is labelled.
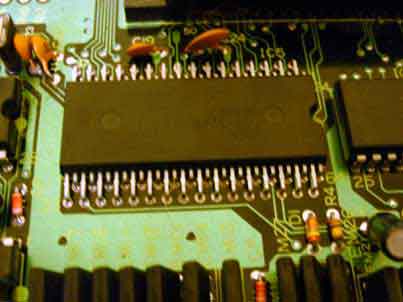
There's many ways to lift leg 57 from the motherboard, you can lever it off with a screwdriver whilst heating the solder up, or hook some wire around it, and pull whilst heating solder. Whichever you decide, be careful not to break the leg, use some small needle nose pliers to straighten the leg once lifted.

Lay some electrical insulation tape under the lifted leg, then prepare the leg by melting some solder onto it. Prepare a short piece of wire (about 20cm), "tin" it and solder it to the leg.
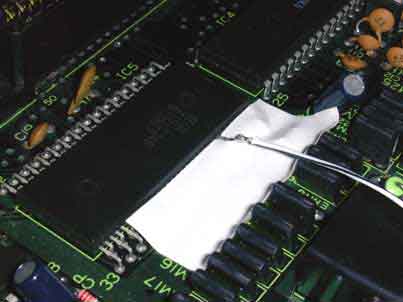
Now we need to solder a wire to 5v, there are lots of possible places, I tried to keep this tidy by picking a point near where we are working. Look carefully at the picture and prepare the same points as I have by melting a little bit of solder onto it. Also prepare a suitable point for Ground, again, there are plenty of areas to do this, I picked a point in the same area, a leg of a capacitor.

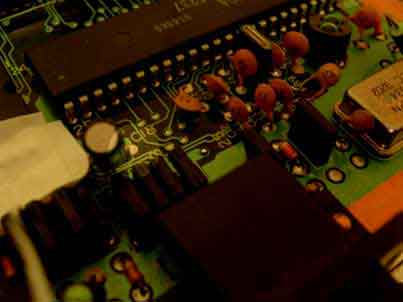
Solder some wires to these points, I used black for ground, and red/white for 5v, route the wires so they are between the controller ports, then stick them across controller port 2. Then replace the shielding.


Now solder the wires to a switch, as usual I have used a small sliding switch that is break-before-make (so it's safe to use the switch with the console switched on), and forgot to mount the switch BEFORE doing any of this work (see the Mega Drive 1 guide for info on mounting these switches). The switch can be mounted where-ever you like on the console. Tolder the wires as shown, the white wire (from leg 57) should be soldered onto the middle contact, the ground and 5v wires can go on either of the 2 remaining contacts. The switch should be a Single Pole, Double Throw, although I could only find a Double Pole, Double Throw - this has 2 rows of contacts, so only one row is used.


Here's some pictures of Alex Kidd running in 50Hz and 60Hz mode. In 60Hz mode there still seems to be some borders, I needs to get some more games to test fully.


You may want to adjust the cartridge connector contacts as in the Mega Drive 1 Loose Cart guide, you may also want to add an A/V port to your Master System 2 so you can use an RGB Scart lead.
Thanks must go to
Summary of Components needed
1 x Single Pole, Double Throw switch
3 pieces of wire

Corp Dwayne Hicks- Admin
- Posts : 74
Reputation : 0
Join date : 2016-03-12
Location : London -

Page 1 of 1
Permissions in this forum:
You cannot reply to topics in this forum|
|
|